If you're experiencing lag in Adobe Premiere Pro, there are several steps you can take to help improve its performance. Here are some suggestions:
1.
Update Adobe Premiere Pro:
Make sure you're using the latest version of Adobe Premiere Pro.
Updates often include bug fixes and performance improvements.
2.
Check system requirements:
Ensure that your computer meets the minimum system requirements for
Adobe Premiere Pro. Insufficient hardware specifications can contribute to lag.
Check Adobe's official website for the specific requirements.
3.
Adjust playback resolution:
Lowering the playback resolution can help reduce lag. In the
Program Monitor, click on the dropdown menu next to the playback resolution and
choose a lower option, such as 1/2 or 1/4.
4.
Adjust preview quality settings:
In the Program Monitor,
click on the wrench icon and select "Playback Settings." Try reducing
the quality settings like "Full," "Half," or
"Third." Lower quality settings will decrease the processing power
needed during playback.
5.
Optimize project settings:
Go to the "File"
menu, select "Project Settings," and then "General." Ensure
that the settings match the footage you're working with, such as resolution,
frame rate, and aspect ratio.
6.
Disable high-quality playback:
In the Program Monitor, click on the wrench icon and uncheck
"High-Quality Playback." This can help improve performance during
editing.
7.
Enable GPU acceleration:
If your computer has a compatible graphics card, enable GPU
acceleration in the "File" menu, then select "Project
Settings," and click on "General." Under the "Video
Rendering and Playback" section, choose your GPU as the renderer.
8.
Close unnecessary applications:
Shut down any background applications that may be using system
resources. This can free up processing power for Adobe Premiere Pro.
9.
Clear media cache:
Over time, the media cache
files can accumulate and affect performance. Go to "Edit" >
"Preferences" > "Media Cache" and click on
"Clean." You can also specify a different location for the media
cache files to improve performance.
10.
Transcode or optimize your footage:
If you're working with footage that has a high bitrate or uses a
complex codec, consider transcoding it to a more editing-friendly format. This
can help reduce the strain on your computer during editing.
11.
Check hard drive speed and space:
Ensure that your hard drive has enough free space and that it's not
fragmented. A slow or nearly full hard drive can impact performance. Consider
using a fast SSD (Solid State Drive) for better read/write speeds.
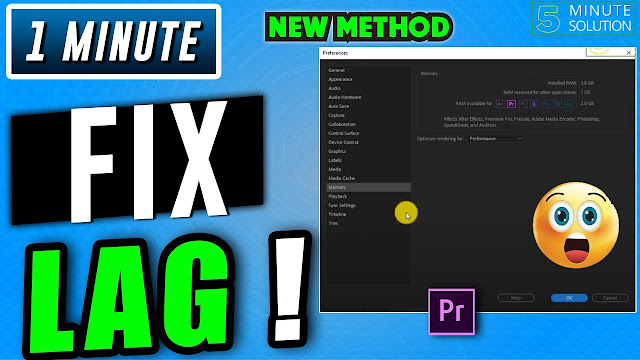
12.
Increase RAM allocation:
If you have sufficient RAM in your computer, you can allocate more
memory to Adobe Premiere Pro. Go to "Edit" >
"Preferences" > "Memory" and adjust the "RAM
reserved for other applications" setting.
13.
Consider proxy workflows:
Creating proxies for your
high-resolution footage allows you to work with lower-resolution versions
during editing, which can significantly improve performance. Premiere Pro has
built-in tools to create and switch between proxy files.
14.
Update graphics card drivers:
Make sure your graphics card
drivers are up to date. Outdated drivers can cause compatibility issues and
performance problems.
By following these steps, you should be able to improve the performance of Adobe Premiere Pro and reduce lag. Remember to save your project regularly and work with a backup to avoid losing any progress.
Comments
Post a Comment
any suggestion on my side